Quantcast
Channel: Cathy Hay's Livejournal
Viewing all 144 articles
Browse latest View live

1908 Dinner Dress: Colour decision

$
0
0
So what is it with the colours of this dress? Did Mrs Hawker love lavender and navy blue, against the dressmaker's better judgment? Did lavender look good with navy blue in 1908? It looks like a terrible clash to me.

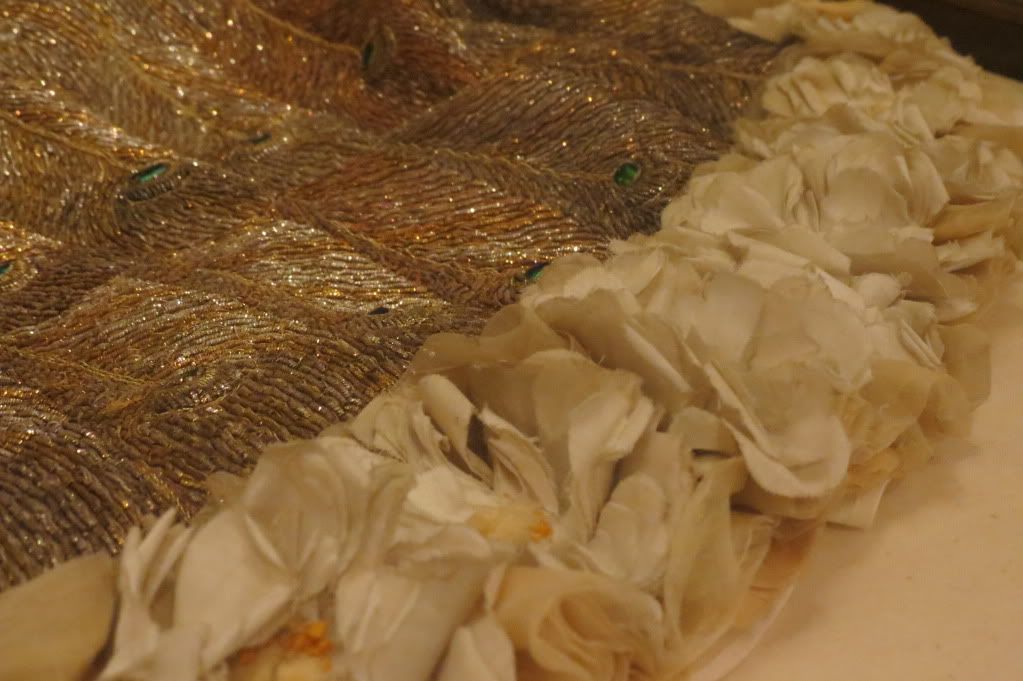
It's more likely, as some of you have suggested, that this is not a lavender dress at all. The silk chiffon of the sleeves and front panel are blue; the thread holding the hooks in the bodice looks like the same blue; the colour in the braid is blue; the colour peeking out from the folds of the skirt is bluer than the rest of the larger expanse of crêpe de chine.

From 1908 dinner dress, original
© Cathy Hay, with the permission of Birmingham Museums & Art Gallery


Now that you mention it, I partly agree; I think this dress could once have been somewhere between royal and navy blue, all over, and the colour has faded or deteriorated in some way on the crêpe de chine only... although that doesn't explain the matching lavender silk satin underbodice and underskirt (below), which seem to be a pretty strong, healthy sort of colour to me.

From 1908 dinner dress, original
© Cathy Hay, with the permission of Birmingham Museums & Art Gallery


This leaves me with a problem.
  • Firstly, there's no absolute certainty here on what I'm looking at.
  • Secondly, dark colours are hard to photograph, and I'd really like a good chance to document the construction process, and a light colour to show off all that drapery to best effect.
  • Thirdly, and vastly more importantly (!), I look like ass in cold blues; I look best in warm colours and a strong colour contrast.
I do want to be authentic, however, so how about this:

What if I did a little research and picked a more suitable colour scheme that was also all the rage in 1908?

I put together a Pinterest board featuring dresses from 1908 and thereabouts. Certainly, various shades of lavender and purple are often seen, and navy's there too. But there's one color combination that I see three times, and it's awesome, and it suits me fine. Three dresses on that board feature ecru/cream with a bold flash of bright blue, and so that will be my colour scheme for this year's Costume College Gala.

Whaddaya think?

New stories from Haiti: Espoir des Enfants

$
0
0
Espoir des Enfants


Espoir des Enfants - Children's Hope. Jacques Africot founded the smallest of the four organisations that Random Acts supports in 2005, under the funding of a First World non-profit. It began with twelve children - more of a large family than a small orphanage - and gave hope and shelter after Hurricane Jeanne flooded the area and killed three thousand people.

Something fell through; something went wrong. The details are sketchy. But funding was withdrawn, and Jacques was left with twelve children whom he was unwilling simply to abandon. He decided to struggle on (heroically, I think you'll agree) as best he could on his own, and today still cares for the same kids. They are aged 8-19, and all are going to school.

Again, you haven't just been making a Peacock Dress happen - you've been helping this orphanage to stay afloat and keep these kids in their stable new home over the last couple of years.

During our stay last summer we helped Jacques and the kids to move into a new, bigger house in Jacmel that provides everyone with more room. We cleared bags and bags of trash out of the garden, arranged flowerbeds and cleaned the place from top to bottom - I think I told you about the Cockroach Apocalypse (stop me if I didn't). Then we helped put furniture together - I will never forget the day that five of us sweat our guts out in one of the small, hot dorm rooms, taking it in shifts so as not to pass out in the heat, trying to put together three metal bunk beds out of parts that were so old and bent out of shape that they just would not fit together. We attempted to beat them back into shape with a broken hammer, and despaired for a convenient IKEA where we could just buy them new ones.

Some of the older girls crochet hats, which they sell - you might have seen me in a black crochet number at Costume College last year, which was made by Rose-Nancy.

If you'd like to continue to help support this adopted family, and RA's three other projects in Jacmel, click here to donate a few dollars to this year's final Hope 2 Haiti campaign.

Thank you!

PS, yes, donations are cumulative (ie will add to your previous ones), and I'll post the leaderboard and the incentives again soon so that you can work towards getting your name in the Peacock Dress if you wish. Over the winter I began sewing the peacock feathers that I promised to send to the biggest donors, and they're starting to get sent out now. Thank you!

Shenanigans at the Château, week 7

$
0
0
Potential energy
It's all completely under control. Honest.


This monster 18th century wardrobe construction project is showing me that my websites work. I have referred to something approaching ten articles so far in order to help me shop, research, pattern, fit and construct. I created Your Wardrobe Unlock'd, Foundations Revealed and History Unstitched because I wanted to use them, and now I can, and that's terribly exciting.

But back to the project: I haven't shared much so far, and that's for two reasons.

Firstly, it's early days and there isn't much exciting progress to show. Having made a basic petticoat or bound another six inches of the edges of my stays isn't as exciting as six more embroidered oak leaves.

Secondly, we are in week 7 of 13 and frankly, I've been a little embarrassed at how far I feel I'm out to sea. When making one dress, fine. Making a wardrobe, and doing it for myself and not a client, is a constantly changing sea of indecision, made more complex by the multiplication of the unrealistic-about-how-long-things-take factor. I had a long wish list of 735 fabulous outfits that I was sure I'd get through in 13 weeks, and obviously, if I'd told you what I was making three weeks ago I'd have been LYING. :D

So here, ta-dah, is exactly what I'm working on and how I'm doing.

The Neverending Stays That Refuse To Be Finished
Almost done, honest. These seem to have taken for-%£&*ing-ever. I made them as well as I could considering the time constraints - linen thread in the machine to make the boning channels look handmade, and I handsewed the seams and bound the edges in leather. I really love the way they look, despite the time taken. Yes, I could do it faster and dirtier, but I wouldn't get as much joy out of it and I wouldn't learn as much. Making this stuff is about more than the chateau.

Then I found that my lovely first-timer hand bound eyelets are too small. I am currently sourcing a convenient knitting needle with which to convince them otherwise (I don't knit).

I was also confused by how easily my linen thread seemed to break in comparison to regular cotton, silk or poly thread. It wasn't actually doing it *too* easily, so I (stupidly) put it down to being a characteristic of linen thread. Then I discovered that the linen thread that breaks easily is generally a missold lacemaking thread - meaning that I now don't trust my linen thread seams on this garment, which will be under considerable strain, and want to re-sew them with something else. I have avoided having a hissy fit by blitzing through it this morning, resewing all the seams in about two and a half hours before I go completely bugnuts at the thought of having to do so.

I still want to cover the seams in contrasting silk ribbon, as is seen in period. This is not essential, so I may leave it as a nice-to-have (*twitches uncomfortably*). So it's now just a case of attaching the two halves, fixing the eyelets, and padding the heck out of the bust, but that's another LJ post.

Here's how they look right now.

Stays


Chemise à la Reine
I started this first because I had all I needed (ie a large quantity of muslin), and it stalled because I need to finish the stays required to go underneath it in order to fit and finish it. No picture because it's still pretty much a folded piece of fabric.

This is my Sneaky Ninja Evening Outfit. I probably don't have time to make an evening gown for the inevitable candlelit costumed dinner(s) at the chateau. I will not be able to compete with the combined Wall of Francaise Fabulousness currently being planned by my chateau-mates. So I am making a dress that has day-to-evening adaptability: a different coloured sash and a fantastic piece of matching jewellery (thank you Swarovski), and I'm done.

Sindy's Mix and Match Outfits
I think I'm being terribly clever by creating a mix and match ensemble. It's hilarious that my green and white colour scheme echoes that of the mix and match outfits my Sindy doll had in 1980. (Sindy: the British answer to Barbie. Better looking, slightly more realistic proportions.) No gingham in 1780, however.

So far, this concept is built around the 1780s jacket in Diagram XXIII in The Cut of Women's Clothes (heileen shows the page here, but I'm not so sure about uploading copyrighted images from a book. Did that count?) Since it's a white jacket with green trim, I'm making a green skirt and a white skirt. I *could* make another, green-trimmed-in-white jacket too. So far, I've made the two identical skirts at the same time, which should work out faster. The green is finished; the ivory one just needs a hem. The jacket is next, when the stays are done.

Green skirtHem of green skirt


Lounging outfit
I have been desperate to make this for EVER. I have finally found the Perfect Fabric, and it arrived yesterday. Happydance ensued. It's more of a Regency open robe than a lounging outfit, but when my friends began talking about banyans, this came to mind, and at a date of 1790 or so, it is still technically 18th century. This will also work for the Jane Austen Festival in September if my Riding Habit of Utter Awesomeness doesn't work out. I'll be making a simple muslin skirt to go under it, and an...

Enormous Fichu
A 1.5yd square of floaty silk mouseline and 10yds of original Edwardian lace (below, bought for Peacock Dress underwear, and to be re-purposed as such later). The ultimate accessory for every outfit. It can't fail.

Lace


Riding Habit
This one, with a waistcoat like this, that will one day be embroidered like this. I really want this for the Jane Austen Festival in September, but I also feel like this is more "me" than all those frilly 18th century dresses, so I wants it NAU. I LOVE this look. The tentative plan is to make the shirt, waistcoat and skirt now, and the jacket in the summer. Stop laughing.

1790 riding habit


A shirt for Francis
zoccolaro has agreed to make me a pair of shoes one of these days, and I'm making him a shirt in return. For the first time I'm looking at more than the pattern, and discovering that these shirts and shifts were not so much sewn as embroidered together - tiny stitches, counted threads, and a new use for the magnifying lamp I bought for the Peacock Dress. This is my Evening Project, and I am enjoying making this most of all. Counting! Math! Ah-hahaha!

Close-up


Yes, I ought to be making all of this by the quick and dirty method. Yes, I ought not to be finishing things as if I was trying to impress a bride. But it's in my blood now, this overachieving professional pride, and it's never been about the end result; it's about the process.

[1908 dinner dress] What is the most authentic method?

$
0
0
Original colour of 1908 dinner dress?


On my second visit to see the dress last week, I answered some more questions. I figured out the order of construction of the fifteen(!) layers of draped fabric and braid on the bodice, which will be fun to recreate and demonstrate. The detective work, I think, is the most fun of all.

Speaking of detective work, I also found the colour we were looking for, deep in the folds of the dress, underneath the skirt. In the photo above you can see a small section of the crepe de chine that seems to match the blue of the sleeves (click on the photo to see an annotated version explaining what's what). This appears to be the original colour of the dress. Sure enough, it looks like the sleeves and front pintucked panel, the blue in the braid and the blue of the thread holding the hooks on is the original colour. It's not a navy blue, but a steely sort of blue, and I can get something very close to it here.

Okay, I admit, it's tempting now to go with that colour. But I'm still not absolutely convinced I'll be doing the right thing, considering the goal I have: I want to recreate not just the object itself, but the experience of the dressmaker and the client in December 1908.

It would satisfy curiosity to see this dress exactly as it came out of the shop, and usually I would order the blue and do just that. But the one colour in which I look like death warmed up is blue. I never wear blue. And if Norah Hawker's mother had looked like me, she would not have ordered this dress in this colour. She would have ordered it in a fashionable colour of the time that suited her and made her feel good. What on earth is bespoke for, anyway?

Here's an analogy. I measured the bust, waist and waist-to-floor measurement of the dress this time, and they're practically identical to my own measurements. Spooky. But I did not take a pattern off the bodice. Why?

Why not take a pattern off this bodice?


The "authentic" method of recreating this dress is to measure and copy the exact pattern of this bodice. But it has been worn, stretched, distressed and shattered in places. It has been distorted by the layers of draping sewn on from the outside, making an accurate pattern frustrating, if not impossible to derive. As a museum professional told me last weekend, two people can take a pattern off the same garment and get two significantly different results. It's not an exact science.

Why not draft it from a period source?


If it was a much earlier dress, yes, we'd do our best with what we can get from this. I have indeed taken a very detailed quantity of information off the skirt and underskirt. But I believe that it would result in a more accurate bodice pattern, and a more accurate experience, to draft the upper portion of the dress from a 1908 pattern drafting book that features an identical bodice. (Marion's Google-fu knocks me sideways once again!)

So once again, here is another way in which I plan to think outside the box on this one. It's about the spirit of it, and the experience of it, and the time travel of it, not just the clinical reproduction of the physical object in the museum archive box. I'm using more than one source to get it right.

[Peacock Dress] News!

$
0
0
Peacock Dress

Mauritia of Reine des Centfeuilles has got back to me. Apparently the embroiderer is claiming that he did not receive our parcel of pictures and instructions, despite Mauritia having received confirmation that it was delivered. "But that's India," she says.

However, our friend in Germany has a Plan. And it's so cunning, you could put a tail on it and call it a fox.

Mauritia is flying to India at the end of this month so that she can hand deliver other orders from her customers. She will stand over him while they construct my samples, stay long enough to see them completed, and then bring them home personally. "So I can directly watch the stitching and call you, if there are any questions or send to you some MMS pictures for a better exchange."

Pictures of my Peacock Dress samples being embroidered in India! *resumes happydance*

[1908 dinner dress] On gold trim and accessories

$
0
0
Trinity Goldsmiths, Nottingham


This is Trinity Goldsmiths. It's my favourite store in Nottingham, despite the fact that I have never actually bought anything there.

One whole window is full of antique jewellery, with dates and prices, and has an imprint of my nose on the glass.

The best necklace in the world ever


This would go perfectly with the 1908 dinner dress. I cannot afford it, whatever my credit card whispers in my ear. So instead I'm going to show you the pleasant surprise I found this week.

I have been despairing over where on earth I will get a reasonable trim for this dress. The gold embroidered trim on the original is very distinctive, very wide (1½"), and while it's futile to expect that I can find a match, mine still needs to be selected very well in order not to risk ruining the overall effect with something too modern. I believe that the trim makes or breaks this dress.

1908 dinner dress (c) Cathy Hay, with the permission of Birmingham Museums & Art Gallery
© Cathy Hay, with the permission of Birmingham Museums & Art Gallery


And then, sorting out my cupboards, I found this.

Trim for 1908 dinner dress


It came from Germany, via a seller at the International Living History Fair who had a suitcase full of old stock metallic trims, cords and braids. I bought it with the potential of putting it on a 1660s gown, but I think it works great for this dress too. There is just nicely enough-plus-a-bit, it's almost as wide as the original braid (1¼"), and I can definitely see it on this project, enhancing without overwhelming it and not giving away that it's a new dress. That's a load off my mind!

Shenanigans at the Chateau, week 8: Something is finished!

$
0
0


I'm so happy with my chemise à la reine! I love the ruffled neckline, which has tons of body, and I love the cotton fringe:


It has a variety of coloured sashes too, one for every occasion. Ta-daah!

My Kryptonite

$
0
0
So here's the situation, as it stands. (I feel like I ought to have a musical theme for each element of the story, as in Peter and the Wolf.)

A trustworthy US Immigration lawyer told me that my best bet for taking my presence in the US to the next level is an E2 Visa, which would grant me residency for two years.

In order to acquire said visa, I need to convince the US authorities that I am serious about setting up my business there. I would do this by investing a serious amount of money in it (about $150,000 over an unspecified period of time), and providing a business plan indicating how it's going to take over the world in the next five years.

In other words, it looks like they'll go for it if they can be convinced that they're going to make a significant amount of tax revenue out of me.

oOo


Sharon sent the written details to me, and after avoiding it like a school report for three weeks, I finally took a look.

Sure enough, it reads in the same way the interview did. Intimidating. It makes a point (underlined) of saying that a "marginal" business doesn't count - that's a business that "only" provides a living for me and my family. Harman Hay does provide a small part time income for four people other than me, three of whom are Americans, but it is small, and I'm not sure that will be impressive enough.

I also took a look at how much money I have "invested in the US" over the past two years. This was looking quite hopeful, considering what counts - paying US freelancers (Marion, Liz, Noelle and all the US writers) and marketing and networking (hello, Costume College) both count. The total for the last year was $28,000, and the year before, $23,000. Sounds impressive to you and me, but they won't be impressed that I haven't yet spent as much as they want to see over the entire five year lifespan of the business.

I'm not sure what to decide. I am aware, after the Haiti/Peacock Dress experiment, that whether or not something is possible is entirely dependent on whether I decide that it is possible. But I am not yet convinced that I want to do what it takes to make this possible. I'm not sure whether I want the business that they want to see. I like my business small, manageable, streamlined and, by offline standards, pretty much under the radar.

oOo


My resistance to all this may be confusing you - when I am this motivated to make this move happen, why spend three weeks pussyfooting around it, and then act so ambivalent? Well, the answer is that no matter how much I want to move to the US, I also have an abiding dislike of authority figures (look at the lengths I've traversed in order not to have any of those), and my least favourite sensation is to be made to feel three inches tall. This project has plenty of both.

I am reminded of the time I was sent on a weekend away to compete for a prestigious place on a grow-your-business trip to Babson College in Boston. My business course leaders in Nottingham considered me the star pupil in the class of 2006, and their best bet for a win, so off I went to a very swish hotel in Liverpool to be assessed. When my interview time came, I explained the dressmaking business and my big ideas for it to a panel of utterly unimpressed judges (picture Simon Cowell et al). When I was done, one of them looked down her nose at me and concluded with a withering look, "That's not a business - that's a hobby".

How I felt at that moment is pretty much how I feel right now. My success in life has been based on charting a path around the ankles of such authority figures, succeeding in what I want to do without ever having to please or impress "them" (*cackle*). I vowed some years ago never to write a resume again, for example, and my alarm bells go off whenever someone expects one.

So my thoughts now inevitably stray in another direction. I want to live in the US, but I will always want to travel. I will always come back to the UK. Perhaps my first move is to have a home in each place? Would I feel settled enough if I had property in both places and made full, lifelong use of the Visa Waiver program that currently allows me to spend 90 days at a time in America? Then perhaps I will never need to tick these ridiculous boxes by charting a path in order to please someone else.

By the time I can afford to do that, I will surely not be such an insignificant little fish any more, and could perhaps try again - and I will have become a bigger fish for me, and not them.

Shenanigans at the Chateau, week 10: "Polonaise Style" Jacket, 1780s

$
0
0
Jacket construction by Cathy Hay

I'm not a draper, more of a pattern cutter, but I decided to give it a try, and was surprised at how much I enjoyed it. I already made a green and an ivory silk taffeta skirt: now, to put something with them. I already showed you what it is I want to produce: here's how I'm doing it.

I'm afraid my bridal couture background has come into play. I cannot bear to make a jacket with only the silk fashion fabric and a linen lining. It's got to have some kind of structure - but I can keep it light.

Jacket construction by Cathy Hay

The skeleton is silk organza, which is crisp, light and helps stop creasing (hello, suitcase). To that I sewed a couple of pieces of linen to support the tops of the pleats (which *is* period) and the area around the neck and front opening.

Jacket construction by Cathy Hay

I laid that onto the silk, cut the silk and pinned the layers together.

Jacket construction by Cathy Hay

Then I added the linen lining, which is often attached to the fashion fabric and treated as one in this period.

Jacket construction by Cathy Hay

The addition of the green silk gives this jacket the distinctive contrast effect that will match both skirts.

Jacket construction by Cathy Hay

The procedure was the same for the backs...

Jacket construction by Cathy Hay

...as well as the collar and shoulder straps.

Jacket construction by Cathy Hay

And the final stage before assembly - the pink trim. I went through many iterations on how to do this - the book just says "pink ribbon trim". At first I thought of flat ribbon, but that wouldn't go around the corners easily where the green and ivory meet. And after trying and failing to find pink ribbon in a decent shade ("Yes, but is it 18th century pink?") - and don't even start me on the trials and tribulations of finding bona fide silk ribbon - I settled on this (above), which is the perfect colour. Unfortunately, when I made it across the room to the roll of perfectly dusky pink silk habutai that was about to save my life, it turned out to be polyester, but by this time I was out of options and past caring. Pinked and sewn down in the manner of about 80% of all 18th century trim seems to be the way forward, but it's hard on the hands. Onward!

Shenanigans at the Chateau, week 11: 1795 Open Robe

$
0
0

© Cathy Hay

Here are the finished photos of my new 1795 gown, completed in just nine days! There'll be making-of photos and details to follow.


© Cathy Hay

Back view


© Cathy Hay

Front view


© Cathy Hay

Front of the left shoulder. I loved the visible handstitching on the original gown and was determined to reproduce it - most of this gown was sewn by hand. I completed it, nevertheless, in nine days, which has got to be a record for me. Began it on Sunday morning, finished it the Monday night of the following week. It REALLY wanted to be made.


© Cathy Hay

The brooch was a gift from trystbat, who made it for me just before I left California in February. It reads, "Sacred to the best of friends".


© Cathy Hay

Cuff with antique Dorset buttons, courtesy of Etsy. I can't guarantee their age - the listing said Edwardian. There's no way to tell for sure, but they are definitely very, very old - the fabric and thread was so brittle, it was like sewing through paper.


© Cathy Hay

The neckerchief is just a square of silk mousseline.


© Cathy Hay

Inside, showing the lining and monogram


© Cathy Hay

A little conceit to commemorate how much I loved making this dress. The style of lettering emulates a monogram I've seen on 18th century underwear.


© Cathy Hay

The original gown in the V&A in London - this is what I was going for. I bought this book and fell in love with this dress fifteen years ago, and now that I finally found the right fabric (great match, right?) and got around to making it, it came together so fast that my head's spinning!

[1795 Open Robe] Making the pattern

$
0
0

© Cathy Hay

Thank you very much for all your wonderful compliments on my new gown! I'm delighted with it, more delighted than I think I've been with anything I've ever made, and clearly you think it's pretty awesome too. It's one of those rare projects in which everything just came together as if it was meant to be, and I'd love to walk you through it, if you'd like to take the tour. If you want details, you got 'em - and I'm going to assume you want lots, so here goes.

As you can see in the photo above, this is a gown that the V&A show off with one photo only - and it's a photo of a detail. I have no record of what it looks like other than this detail photo and the line drawings on the left hand page, so making it come to life was a process of putting together the puzzle pieces.

As well as there being so few images, of course there's no pattern - but we do have a very similar pattern. Two, in fact, because a similar gown of near-identical date was patterned both by Janet Arnold in Patterns of Fashion 1 and by Norah Waugh in The Cut of Women's Clothes (I recommend hunting for a second hand copy of that second title). Looking at the details, I'm sure that both Ms Arnold and Ms Waugh got their mitts on the same dress, which is, incidentally, also in the V&A in London.

Now, I know I'm not supposed to reproduce images from books blatantly, but it would help to show you the general idea of that similar gown and its pattern, so I'm going to be very cheeky and link to images uploaded by people who are less nervous about copyright than I.

Here's Janet Arnold's drawing of the similar gown
...courtesy of Jenni at Living With Jane, whom I think I probably know on Facebook, if only she'd give her surname.

Here's Janet Arnold's pattern
...courtesy of Lauren at American Duchess, whose shoes are awesome and totally worth the import taxes. Also, A* for customer service, Lauren. You rock.

What I want you to see in the pattern is that this is pretty much a rectangle of fabric - apart from the joins between widths of the textile, it's pretty much a case of taking an enormous rectangle and pleating the heck out of it to create a bodice shape at the top. The small pieces down the side of the page are just the bodice lining pieces and the sleeve - the main part of it is just a heavily manipulated rectangle of fabric.

But how big a rectangle? How much fabric is there in this thing?

This is where we turn to the details of the gown on the V&A website - hit "More information" and you get a surprising amount of facts and figures. (Here comes the Math part.)

"Length: 70 in back, neck to hem, Length: 72 in front, shoulder to hem". Awesome. No matter how small the person who wore this, draping a tape measure 70" from the nape of my neck indicated that this length pretty much matched the line drawing in the book (ie, floor length with a satisfyingly delicious train). So I know how long the rectangle needs to be (plus a few inches to allow for screw-ups, naturally.)

"...constructed from two and a half pieces of fabric, 42 inches wide selvedge to selvedge..." Now THIS is what I really needed to know. Two and half pieces, 42" wide equals a total of 105" wide, or 267cm, since I'm in Europe. :P


© Cathy Hay


So now that I had some dimensions, I could rip up an old flannelette sheet and get draping. I was pretty excited at this point, since I had such exact dimensions to go on, although as you can see in the photo above, Freddie, Dexter and Joss were singularly unimpressed.

Since I'm reasonably symmetrical, I draped one half only, beginning at the centre back with a piece of fabric approx 150cm (60") wide and 2m (80") long. So I pinned it down the centre back, along the grain of the fabric, and first of all gave it two fairly even pleats towards the center back. No shaping required in these, it was literally a case of pleating a bit of fabric away to make a nice pleat at the centre back of the skirt.

But how big should I make the pleats?

I measured around the mannequin at the largest point (bust level), from the centre back to the position where the front edge of the gown needed to end.

(total width of my fabric) - (this measurement) = (total amount of fabric I need to pleat away out of sight)

Amount of fabric to put into each pleat (roughly) = (total amount of fabric I need to pleat away out of sight) divided by (the total number of pleats I'm making)

The total number of pleats all the way around was the number of pleats I could see in the photo of the back of the dress, completed by adding the number I could see in the front of Janet Arnold's pattern.

With each pleat I was therefore roughly putting away 7.5cm (3") of fabric. This isn't exact - obviously the shaping would be achieved by making pleats bigger or smaller on the way around the body - but this gave me a ballpark I could work with.


© Cathy Hay


After doing the centre back pleats, I pinned the shape of the curve I wanted for the second row of pleats (above). Again, I pleated away roughly 3" of fabric each time, making the fabric continue smoothly around the mannequin.

I took care to ensure that when I finished a group of three pleats, the threads of the cross grain of the fabric were always horizontal at the bottom as the fabric travelled around to the next group of pleats.

This ensured that the skirt would hang right - but I also checked this by draping a piece of fabric that was the entire length of the dress, not just the bodice. When the pleating was done, I'd be able to arrange the skirt around the foot of the mannequin and ensure that everything looked good.


© Cathy Hay


I also ensured that I was making the pleats go further down towards the waist than I really needed them to go; unpicking them a bit would be easier than trying to make the pleats longer later.


© Cathy Hay


As for the armhole, I just left as much fabric there as possible, since I knew that the sleeves would be tighter, with a smaller armhole, than modern sleeves. I could cut this back later.

I followed the look of the V&A picture as much as I could, eyeballing it, although at this stage I didn't yet bother trying to offset each pleat to show a sliver of the pleats beneath.


© Cathy Hay


At the front, I copied the general look and number of pleats in the front of Janet Arnold's pattern, smoothing it up over the shoulder and letting the fabric tell me what it wanted to do, if that makes sense. As you can see, I ran out of fabric and had to pin another piece on to have enough to go over the shoulder.

Link from Lauren, The Lady of Portland House, who gives a dress diary for her own open robe.

This then met the back piece (see the image of the back again, above) - I pinned a line along the back piece from neck to armhole, showing where I wanted the shoulder seam to be, and drew the front over the shoulder to meet it.

Here's the overall result, which gave me one heck of a happy on a Sunday lunchtime.


© Cathy Hay

© Cathy Hay


And then I marked the edges of all the pleats with a black fineline pen, and unpinned it flat onto the table. As you can see, I had to take care to mark and number the groups of pleats in order to be able to make sense of this thing.


© Cathy Hay

[1795 Open Robe] Fabric + Pleating = Gown

$
0
0

© Cathy Hay


Here's part two in the making of this gown. Part one is here, and the finished photos are here.

Once I had a pattern, it was time to move onto the pretty fabric, and I needed three pieces joined together side by side in order to make the width I needed. Really, the only way to do this with the pattern matching just right was to fold under and press the edge of one piece, and handstitch it to the next one from the right side.


© Cathy Hay


Freddie and Dexter were spectacularly unimpressed by this decision.


© Cathy Hay


But I thought it looked pretty cool when I began sewing down the joins with a combination stitch (mostly running stitch with an occasional backstitch to hold it firm).


© Cathy Hay


I laid the pattern on top of the doubled fabric and cut the top edge. Transferring all my markings from the pattern to the fabric proved to be the biggest pain of this project: I pinned through the pattern and fabric, turned the edge of the pattern and began transferring the pins from on top of the pattern to under it, then took the pattern off the top.

I was now left with the doubled fabric, pinned half to death (above). Then I carefully turned the whole thing over and hand basted the markings on the other side of the dress.

Then I could open out the whole width, and the fun could begin.


© Cathy Hay


This is one side of the centre back pleats.


© Cathy Hay


Here are the first set either side of three slightly offset pleats; I eyeballed the slight offset width.


© Cathy Hay


And at the top here, you can see the beginning of the little visible backstitches that I love so much in the photo of the original gown.

And this is what it looked like when I was done:


© Cathy Hay


© Cathy Hay


© Cathy Hay


My pleats were still the slightly-too-long-just-in-case pleats that I'd pinned on the mock-up; as a result, you can see really clearly how this was a transition from the earlier Robe à l'Anglaise style. But for 1795 we need that waist a lot higher...


© Cathy Hay


... so I pinned my new waistline level and unpicked the pleats a little way.

More to come in part 3.

Shenanigans at the Chateau: 2 weeks to go

$
0
0

© Cathy Hay


Things are hotting up, so here's a quick rundown of the irons currently in the fire.

Here's a hat - straw originally, which I've covered in black silk velvet - you're looking at the blue lining inside the crown. I've also sewn millinery wire around the edge, so that I can curl the brim upwards, and bound it in satin. Who knows whether a satin edge on a hat has ever been in a Gainsborough portrait, I don't have time to justify it, but I like it. The feathers will go in the suitcase and be assembled at the château.

This is one of my "morning" projects - in other words, a small and fairly brainless task that I can pick up and put down easily. When that lining is in, there are a couple of pockets cut out that will be the next "morning" project. I'm trying to use every moment, and at present there is often an odd half hour between when I'm ready for breakfast and when Demi is ready, so between 7:15 and 7:45am I work on this kind of thing.*


© Cathy Hay


Here's a shift, which I made yesterday and today. I did this specifically looking for a way to make neat and acceptable linens by machine. I was making the most beautiful handstitched shirt for zoccolaro, but despite my best efforts I messed up my calculations, cut it too small and had to begin again. So it can no longer be handstitched, but I'm nevertheless still trying to maximise the beautiful while he waits for me to produce the real shirt post-chateau. This shift is the practice run.


© Cathy Hay


Here's where I'm handstitching just a little - the eyelets, and the stitches holding the linen tape for the drawstring down. The lace is an undecided quantity as yet. The zigzag edge will match my new jacket well, but I'm not sure it's 18th century enough.


© Cathy Hay

© Cathy Hay


As for the jacket, that's coming on well as you can see, but I'm apprehensive about the amount of work left in it. I'm finishing everything else first, and then I can get behind on this at my leisure. I'm also leaving it in my eyeline on the mannequin while I consider the wrinkles in the back.

At first I had a waist tape in it to hold the centre back in to the waist (left), but I took that out thinking that it might be causing the wrinkles, slapping myself for thinking like a Victorian dressmaker (I don't recall ever seeing a tape tied in front holding an 18th c bodice back into the waist.) Then I also secured the tops of the pleats, the weight of which may have been pulling on the seams. The photo on the right shows the improvement (with the shadows cranked up to show you what I can see), but I'm still not happy. The back lining is not in yet, which may help, but I'm currently leaving it there and walking past it a lot in the expectation that inspiration will strike soon.

However, all is going well. The wigs, which I delegated to the Historical Hairdresser, have arrived and are so awesome I want to wear them to the grocery store. And other than the projects I've mentioned, the only one left outstanding is to make a long cotton petticoat for the 1795 open robe, which is just as well. This time in two weeks, I'll have just arrived en France.


* In the unlikely event that it's interesting to anyone but me, the rest of the routine is as follows:
6am, I'm up, shower and dress
6:45-7:15 Go nuts on trampoline
7:15-7:45 Morning project
7:45-8:30 Breakfast; Demi leaves
8:30-12:30 Sewsewsewsewsew
12:30-1:30 Lunch
1:30-6pm Work
6:00-7:00 Dinner
7:00-9:00 Either yoga class, grocery shop or sewsewsewsew, depending on the day of the week.

Weekends are slightly more relaxed, but I'm pretty much sewing from 9am-9pm on most Saturdays and Sundays. It's become a military operation over here. I sew SLOWLY, so the hours are crucial. Hi, I'm Cathy, and when left on my own in England, I'm a workaholic.

[1795 Open Robe] Completing the dress

$
0
0

© Cathy Hay


Here's part three, the final instalment in the making of this gown. Part one is here, part two is here, and the finished photos are here.

Lots to get through to finish this, so I'm going to make it picture heavy and text light.


© Cathy Hay


So here's where we were up to; we've got a heavily pleated piece of cotton in the shape of an open robe, and it's flat on the table with pleats that now extend only just below the bust.


© Cathy Hay


Next, I draped the lining for the bodice, which would be loose at the bottom edge, where the pleats finish. I realised at this point that I'd done this backwards; you're supposed to drape the lining and then pleat the cotton on top, not pleat the cotton and then drape the lining over it. But by putting the dress inside out on the mannequin, the lining would end up a tad bigger, which is good - tailors always put ease (even pleats of extra fabric) in their linings so that they hang loosely inside the garment and do not distort the outer layer.


© Cathy Hay


After smoothing the back, I smoothed around to the front - with a high waistline and an open front, this was possible in a single piece of fabric, with no seams.


© Cathy Hay


Just a pleat in the centre back, to allow for any mistakes and give a little extra room, just to make sure.


© Cathy Hay


Then I could open it all out and baste the lining in.


© Cathy Hay


The back neck edge was a conundrum - hidden under the collar, it's impossible to tell exactly how this was treated at this awkward point. I decided to go with the method used on earlier 18th century gowns - we're going through a transition, after all. I pinned the shoulder edges down to lay over the back section, smoothed the centre back top of the lining over to the outside....


© Cathy Hay


...and added a strip of linen over the shoulder join on the inside, where I'd cut the lining a little too short. (D'oh!)


© Cathy Hay


And then it was all finished off with a strip sewn down on the outside that appeared to complete a square collar shape at the top of the back. I realise at this point that I never took any photos of the collar, but this was simply another piece of collar shaped fabric, with a rolled hem all around, that I handsewed over this edge last of all.

Through the door at the back of that photo you can see my sewing room. I've recently made a video showing how I work and how I've got to adapt myself to work in other people's sewing rooms this summer if I'm going to make a success of the 1908 dress - that's coming soon.


© Cathy Hay


And now for the sleeves. I began with the Janet Arnold pattern - visible on the top right of this draped sleeve. I enlarged to the left to just exceed my bicep and elbow measurements, and lengthened it to create something that'd be wrist length, as the drawing of this gown indicates. Finally, I cut it down the middle to create a two-piece sleeve, again to match the original gown.


© Cathy Hay


Since that new seam is straight, I got the chance to pattern match again down the back of my arm, as far as my elbow.


© Cathy Hay


I cut one part of the sleeve, matched the pattern on the rest of the fabric and sewed that seam, then cut the other half of the sleeve, working out from that seam.


© Cathy Hay


The sleeve lining was pieced, since I was running out of off-white linen - here's where the sewing machine came out for the first time. I had no qualms about doing so, surprisingly, since I really didn't care whether anyone would ever look inside the sleeve. Piecing is period, and my seams were neat despite the modern method. I was picking my battles.


© Cathy Hay


And here's the placket at the wrist, since the original cuff closes with "three Dorset buttons". I had way too much fun mitring the corner.


© Cathy Hay


Adding the lining...


© Cathy Hay


...and the buttons. Antique, possibly Edwardian, from Etsy. They are certainly old - it was like sewing through very brittle paper. Instead of making buttonholes, I sewed them onto the outside of my "real" placket, through both layers, which is semi-couture - I also picked my battles regarding whether or not to do buttonholes, and decided I didn't need them, but the real placket is a nice touch. Another tailor's trick is always to make the outer side of the placket a millimetre or two longer than the inside, just to ensure that the underneath layer isn't visible at the cuff edge.

At this point I set the sleeves into the dress, after finishing the fiddly cuffs.


© Cathy Hay


And finally, the belt. A stronger piece of canvas interlined it, and I trimmed the seam allowances of the canvas and pressed the cotton over the edge to give a crisper finish.


© Cathy Hay


Then I added piping. I had no picture of the belt, of course, but had my heart set on self fabric piping. I had such a clear idea of what I wanted it to look like and had no idea why - but tracked it down to the cuff on this dress (there's a close-up photo if you scroll right), same period, same style, in the same book even, and that justifies the shape and the piping enough for me.


© Cathy Hay


Finally, lining, and I handsewed through all three layers from the outside to give a really pretty, flat edge to it, and finished the end neatly so that it could be sewn inside the dress by hand.


© Cathy Hay


And finally, a little cross stitch embroidery, and I attached it to the dress.


© Cathy Hay


And there you have it! More finished photos here. Thank you for reading! Do let me know whether any part of this was particularly useful to you, and what kind of detail you want me to give in future. This is for you, and I want it to be useful.

Shenanigans at the Chateau, two days to go

$
0
0

© Cathy Hay


We're almost at the end of the marathon; the finish line is in sight. With two days to go until I leave for the chateau, here's how it's going.

Above you see something that I'm conveniently calling a petticoat.

I originally had a half-assed idea that the space at the front of the Open Robe would be filled in with a quick white cotton skirt and a patch that'd cover the space in the bodice, and I'd be done. But of course, Regency petticoats have bodices because a skirt that hangs from your underbust won't stay up without one. So I soon realised that I was making a dress, in modern parlance.

This was about three mornings and a full day for me, so about 24 hours' work. I used all the cotton muslin I had, since I'm a great believer in "the more fabric, the better", and in 1795 the look was soft but full anyway, prior to the acceptance of the sheer scraps worn a few years later. The top layer of the skirt has about 4m (4.5yds) of width in it, and the underlayer, 2.2m (2.5yd). I wanted it sleeveless so that I have a cooler layer under the robe, and so that I can wear this thing to death later in a non-costuming context. There are lots of cute little details, like the piped waistband and some lovely Victorian buttons, as well as a pad that ties into the back waist and can be taken out for washing, but those photos will have to come later.


© Cathy Hay


But here's one quick, ridiculous photo I did take. I wanted it quick and correct, so the only way was to drape the front on myself. You see in my eyes the sense of silliness mixed with delirium that the final stages of this chateau project has brought. By now, as you can see, sewing was coming before hairstyling.


© Cathy Hay


A pair of pockets. Quick and machine made, but I was determined to have some and to bind them with the remnants of the chintz from the open robe. By now I had run out of white or cream linen, but luckily the botched sleeves from zoccolaro's shirt saved the day.


© Cathy Hay


And speaking of His Lordship (as he is now forever dubbed), here is the shirt in question. The seams are machined, but it was amazing how much handwork I did manage to crowbar into this thing. More of the antique buttons saw the light of day, and I made the buttonholes and monogram to match.

I did this in about 36 hours over an intense four days, and I'm pleasantly surprised by how pleased I am with it.


© Cathy Hay


Everything is finished now, except for the neckline of my shift (an easy bit of handsewing for the journey) and this jacket. Its sleeves are on, its edges are getting finished, and its collar needs its trim and to be attached. And finally, buttons and a front closure. It's a hard slog, this one - it's unfortunately one of those projects that just goes on and on - but I will take it with me and finish it side by side with some dear friends, who will also be finishing their own clothes, by all accounts.

I'm loaded up with drugs to smuggle into France (fulfilment of multiple Cadbury's and Migraleve orders) and almost ready to go, and so it's time to look back and evaluate how this project has panned out. That'll be my next post.

Shenanigans at the Chateau - Photo Album

$
0
0

All photos © Cathy Hay except where stated

So here's where I was living last week and the week before.

We had cannons...


...and a view that made me feel like Georgiana looking out over the Chatsworth estate.


Everybody pulled out all the stops to make the clothes to match....


...and then felt more than justified in posing all over the grounds.


Venture a little way off the chateau steps, outside the clipped hedges, and there were avenues of trees...


... a lawn perfect for a sprited game of ninepins....


... and a pond with a boat.


Photo © Trystan L Bass

This was probably my very favourite moment. Should we? Should we not? But we're wearing silk! And we handsewed! And there's algae! And no oars! But wait, no - ONE oar! Can we? Should we? Is this a bad idea? Should we come back another day, with regular clothes and another oar? NO! WE'RE DOING THIS NOW!! SEIZE THE MOMENT! WOOHOO! And we felt wild and daring and crazy and adventurous, and we made it around the pond and back to shore in one piece, whilst looking fabulous. Who dares, wins!

(And thank you for that to poor Francis, who was too busy with heart in mouth trying to get us back in one piece to enjoy it as much as I did!)

We were froofy...


... we were soppy (Congratulations Leia and Elliott!)...


... usually tipsy...


.... always saucy...


... and we squeezed out every last drop of awesome we could find.


No, wait - the pond was not my favourite moment. My favourite moment was on the first costumed day, when we were taking the first batch of incredible photos. I walked up the steps from the garden onto the terrace to go inside and find another glass of champagne. In the bright sunshine, as I reached for the ornate handle of the panelled glass door, I was suddenly taken by surprise by the image reflected in the glass of a beautiful woman with huge, amazing hair, wearing a pristine chemise à la reine, looking like a goddess, with a heavenly view behind her of rolling hills and blue sky. Now, I know I look good, but I never felt so much like the ugly duckling seeing the reflection of a swan for the first time.

That one split-second, magical time travel moment swept me entirely off my feet and made the entire effort pay off a hundredfold.

(I'd love to hear about similar moments you've had in costume.)


Thanks so much, guys - trystbat, demode, modehistorique, zoccolaro, fleurdelysa, jubilima, and the rest who aren't on LJ. Let's do it again. SOON.

Shenanigans at the Chateau - Project Recap

$
0
0

All photos © Cathy Hay unless otherwise stated

And so it is done, and it's time to wrap this baby up. The suitcases are empty and sleeping in the garage, and there's a diminishing pile of objects that must be cleaned, ironed and put away. All the days on my little paper timetable are crossed off, and it sits on my desk, replaced by a new calendar on the wall.

So how did it go, as a sewing project?

First of all, I'm delighted to say that a career in bridalwear has stood me in good stead. I began in February by printing out a calendar and posting it on the wall, deciding that I could sew each morning from 8:30 till 12:30, and all day on most of the weekends. Since I prefer to sew slowly and carefully and was creating an 18th century wardrobe from scratch, I knew that I simply needed to give it as many hours as I possibly could.

Though ambitious and intense, this worked beautifully for me. I simply sprinted like mad until I fell over, then relaxed for a day, got myself together and got up to begin running again. Looking at the calendar, it appears as though I only hit that wall and had to step back twice over the whole 13 weeks, which is wonderful, and a testament to how excited I was about this project.


Chemise à la reine, because I can't get enough of these photos. I have never been so delighted with any photos of myself, ever, as I am with these. (The beautiful borrowed original shoe buckles helped; I felt like a princess.) The best part about this gown was its versatility - change the sash, the jewellery and the wig and it looks completely different (below left). No pictures of the Masquerade dinner yet, but those will demonstrate this best.


It has been a wonderful experience.


.

This outfit was by far the most labour intensive, with a lot of handsewn trim. But it was very much my style; I felt myself in it. This is a big lesson I'm learning lately, to make what I want to wear, what suits me and what fits my character, not just what looks interesting to make.


Another thing I learnt from bridalwear is the importance of planning the last few days. I planned to finish sewing a week before I left England, and planned in a pamper day and a packing day. That doesn't mean that I did finish sewing a week before leaving, but it meant that I had a lot less on my plate than I would otherwise have done, no sense of panic whatsoever, and I was able to catch up on sleep before I left.


© Thomas Dowrie. This is the only photo so far showing the open robe full length. I know Kendra took some dedicated photos of this gown, which I'll share with her permission when she's back from France. It was a wonderful outfit to wear, so comfortable and warm. I felt at home in it, and was hugely proud of it.


So how did the reality compare to the plan?

I had planned to make more, of course, but these three outfits turned out to be plenty, both for packing and for wearing. The variety of accessories - two wigs, two hats (I only wore one), jewellery and sashes - made each one versatile enough to feel fresh each day.

I overplanned by one outfit and a couple of garments: I am still desperate for an 18th century riding habit, although my jacket did very well for that smart feeling, and I had planned on a cloak, but my Victorian embroidered piano shawl turned out to be plenty warm. I was one underpetticoat short of my plan, and a pipe dream mid-project for a grand robe à la francaise was never practical enough to be a serious expectation. It would have been nice to handsew nine metres of Edwardian lace (which looks 18th c enough) to the edge of my fichu, but I never even wore the fichu (when one's figure is modestly blessed, one doesn't feel like covering up the assets one has.) The jacket never was quite finished, but I'm not going to tell you what small decorative detail is missing; you can look it up for yourself....

I planned in half days in order to try to muster up a realistic to-do list, but here are the results in full days for how long things actually took:

  • Jacket, 8½ days
  • Open robe, 6½ days
  • Francis' shirt, 4 days (plus a false start of 3 days when I messed it up)
  • Stays, 3 days
  • Two petticoats (cream and green, both to match the jacket, one of which went under the chemise), 3 days
  • Chemise à la reine, 3 days
  • Petticoat for open robe, 2½ days
  • Bum rolls, pockets, fichu and sashes, total 1½ days
  • Black velvet hat, 1 day
  • Shift, 1 day (plus sewing the lace onto the neckline on the plane and at the chateau)

That all sounds like I sew like the wind, but I really don't; a "day" was anything from 8-12 solid hours, and except for the weekends, I was sewing in 4-5 hour half day bursts, always in the morning, when I'm at my best.

The biggest thing I learnt was the importance of The Stash. I have been sewing for a long time, but I have never had a Stash - other than the remnants of finished projects - because my work was almost always for others. There was a contract, a specific fabric requirement, and I went and bought what I needed. I thought of buying fabric for its own sake as an expensive weakness, and often a waste of money because your money ended up in a fabric cupboard, gathering dust.

For this project there was no set contract, and the plans changed dramatically in the early days. I had no Stash at all; what remnants I'd had were now in Haiti, so I bought a pile of fabric from modehistorique's stash.... and hardly used any of it. See all the ivory silk taffeta and white muslin in the finished costumes? That was set aside to make the Peacock Dress with, when I was going to do all the embroidery myself (obviously now it'll be done in India, so they'll get fabric themselves as per my requirements). The green silk was bought for the Charles II project that never got off the ground a few years ago; it was hanging in my office window as artistic drapery when I was planning these outfits.

Maybe I'll pay more attention in the Garment District in future.


In conclusion, I'm marking this one as an unmitigated success. I set an ambitious plan and achieved more than enough of it, and although there may have been moments of frustration sometimes, I remember it overall as a joy and a delight; most of all, I had FUN.

More photos here, now that trystbat has uploaded her incredible series of images, including lots of shots of the interior of the chateau. The legendary Trystan is also working on an article for Your Wardrobe Unlock'd on how to pull off a trip like this for yourself (clue: it's not half as difficult or expensive as it seems)... and we're hoping that her fabulous husband Thomas will also have the Official Chateau Music Video ready to release by the time it goes live..... oh yeah, we went there...


And with that, it's time to leave the eighteenth century and whisk ourselves forward about 130 years.... to 1908, and a little something for the Costume College Gala on August 3rd!

This year, it's not about me, it's about you.

$
0
0

A moment in one of my classes at last year's Costume College. This year, it's not about me, it's about you.

At Costume College this year I will be giving two brand new classes. I'm very excited to be allowed to teach them, and I want them to be awesome and incredibly useful for you.

Both of them are pretty broadly defined. I wrote a description for each because I had to, but I'm committed to ensuring that rather than just standing at the front and talking, I actually cover the specific concerns or questions that are vital for you.

So tell me more about what you want to learn from the following events*. Tell me what you expect, what questions you hope I'll cover, why you're excited about them - give me feedback, people, so I can make these the best classes ever!


Starting A Small Costuming Business
Friday 11:30am-1:00pm

"Want to ditch the day job and sew instead? Sewing for a living can be enormously rewarding, but there are some pitfalls to avoid and some opportunities to make the most of. Here’s how I made it work – and how you can avoid the mistakes I made."


How to Conquer the World
Saturday 10:30am-12:15pm

"Got big ideas (your own sewing business? An epic Gala costume?) but never seem to get it together? Here are some ideas on how to overcome procrastination and fear and summon up the courage and energy to make it happen, baby!"


* If you're not going to be there but wish you were, I'm interested in what you think too - just let me know whether you're giving me feedback as a Coco attendee or not.

[1908 dinner dress] Want to avoid fitting hell? Here's how.

$
0
0
1908 bodice drafting diagram


When I studied the 1908 dinner dress in the Birmingham museum, I took one look at the stretched, distorted, semi-shattered bodice and knew that taking a pattern from it would be a frustrating and futile exercise. Instead, mmcnealy found me a 1908 pattern drafting book containing an identical bodice, so I chose to use that to make my pattern.

Not only did this save me a lot of angst (and save the dress a lot of stress), but it taught me more about real Victorian and Edwardian dressmaking than I ever would have discovered otherwise.


1908 dinner dress (c) Cathy Hay with the permission of Birmingham Museums & Art Gallery, UK
© Cathy Hay with the permission of Birmingham Museums & Art Gallery


The top and above photos show the the identical bodice draft in the book to match the real 1908 dress. Just like the dinner dress, the draft has a front piece with two darts, a side, a side back and a back. Although the seams aren't easy to make out, you can see in the photo where the dress is boned at the seams and along the darts, and at center front.

Taking measurements the 1908 way

I took eighteen precise measurements exactly according to the text in the front of the book, which gave very specific instructions for the budding professional dressmaker on how to measure one's client confidently.

In 2013 this required some creativity, since the measurements almost all made use of a measuring device I have never seen in the modern day. LJ hive mind, if you ever see one come up on Ebay, let me know - you're looking for an L shaped ruler with an additional sliding arm, which has a tape measure attached at the corner of the L square. Having an original one to use would be very cool.

I measured in the underwear of the era. Jenni "Sparklewren" Hampshire recently made me a fabulous, accurate corset for 1902...


...and although there was some transition in corsets beginning to happen in 1908, toward the longer, less cinched Teens look, my research suggests that there were still plenty of full-on straight front earlier style corsets being made in 1907-8. (Phew.) And if Nancy Bradfield's drawings of the dress (below) are to be trusted, I'm going to need that waist.


Proportions, or How They Achieved That Hourglass Shape

Here's where the first "Aha!" moment happened. The drafting book gave instructions for making a tight fitting bodice (ie suitable for eveningwear) for average, smaller than average and larger than average figures. It defines an "average" figure as one in which the bust is eleven inches larger than the waist.

This was vital information that I couldn't have got from the dress itself - I would have measured each piece, established the measurements of the original bodice, and adapted it to fit whatever was comfortable for me, without any sense of how a woman would have manipulated her natural measurements back then. I think that this is where modern costume making can sometimes seem lacking in some elusive way that we can't put our finger on; we fit the bodies we have, not the shape that they made out of their bodies, and it doesn't seem the same somehow.

With this information, I was able to get my waist down to a comfortable minimum (25¾") and pad my bust up to hit that ratio. This was, in many cases, how women of the era achieved those eye-watering proportions. Most of those women were not as ridiculously shaped as we think, compared to modern standards; the primary reason that historical corset patterns do not seem to match modern bodies, I believe, is because we tend to try to lace the waist down without padding the bust and hips out, and find we can't come close to that ratio, and make assumptions about tightlacing as a result.

So with my 37½" bust and 25¾" waist* (I know, I know, overachiever), and sixteen other measurements, this is what the drafting instructions gave me.


I didn't believe it. This sucker had negative ease. It told me to cut the mock-up a peppermint-tea-splorfing 2¼" smaller than my corsetted waist, and it was supposed to be that way, it wasn't a mistake. That couldn't be right - I even made one of the darts smaller because I didn't believe it'd work. But when I made it up, I ended up pinning that dart back in, because by golly, it's perfect, and it fits like a second skin, a perfect canvas for all that draping.


Now, if I had taken a pattern off the dress, I would have risked more damage to the antique from handling. I would have got frustrated peering at the threads, trying to establish grain lines. The stretched and shattered parts, as well as the parts distorted by the drapery sewn on the outside, would have messed my pattern up some more.

Ultimately, with this or with a commercial pattern (no matter how good), I would have had the usual struggle to re-size it for myself. I would have sized it in relation to my body measurements with a modern sense of ease, so that it moved over my body rather loosely by comparison with this. I would have been in Math hell (even for me) trying to get the pattern and fit right for my measurements.

Instead, I went back and used the same method that the original maker probably used, drafting directly from careful measurements, and got it almost perfect** first time. AND I got the proportions and fit right for the era.

Don't be fooled: it isn't my body type that made it so simple; it's the method. Drafting works, and period drafting gives your work some awesome nuances that you never knew were there.

Eureka, folks. Eureka.


* Incidentally, the measurements of the original dress are bust 38", waist 27", so I estimate that the actual measurements Nora Hawker sported were about 38"/28". Waist to floor is 109cm, making her just about exactly my height - 5'7". I hope I can achieve the silhouette Nancy Bradfield imagined in her drawings, however, which really could be quite a distorted fashion illustration of willowy ultra-curviness. I trust that the reality will look as good.

** One measurement not required was the neck-to-shoulder, and since I have always had broad shoulders (the dresses my grandmother made me were always too big in the shoulders on my sister), the mock-up is a bit small there and I added a bit. No big deal.

Moving

$
0
0


I think - I think - we have a winner. I have had my hopes built up and dashed a number of times, as you know, but I think I have just found the means by which I can obtain a longer-term visa to enter the United States.

A new lawyer has mentioned not two, but three options.

One, the Extraordinary Ability option that we already know about, for which I'm not big and fabulous enough YET.

Two, the E2 Treaty Investor, which the last lawyer detailed, in which I must prove that I am setting up a business in the US by spending an Unspecified Significant Amount of Money on it, like $130,000+. Annoyingly vague, also out of my league, and when that lawyer established that I was not going to come up with the $$$$, she stopped answering the questions that might have helped me work towards that option.

However, it turns out that this option is intended for an investor who wants to, say, buy a restaurant and go out there to run it. And it's only half the story.

Three - hold onto your hats, folks - the E1 Treaty Trader visa. I have to prove - wait for it - that more than 50% of my international trade is with the US. And that's about it.

I know, right? One of the hallmarks of my business is that at any given time, anything from half to two thirds of our members have been Americans. Why did no-one mention this before?

The volume of my business's transatlantic trade must be "significant and continuous". No problem with that second item, thanks to the subscription model, and although the first is vague, I also note that "we typically issue the first E-1 or E-2 for two years. We do so because most of the businesses we see are relatively small and small businesses are volatile and often do not succeed." Harsh, but did you hear the word "small"? If this is about percentage and not dollar value, we're onto a winner. (By the way, a successful renewal is generally for five years, which gives me time to get fabulous).

As for exactly what I need to do, anything but vague. The London US Embassy website details exactly the kind of two-or three-ringed hardback binder I must provide, and the exact documents that need to be inside. I have to prove that I am British, that I live in Britain, that I intend to come back (because, despite my fantasies, I ought to give the place a couple of years' trial run before I jump in with both feet, right?), and that my business does more than 50% of its international trade with the US.

I'm not sure I need a lawyer at all (which may be why lawyer 1 didn't mention this), and I apply with my payment of $270 to the US Embassy in London. I can expect to wait about 90 days for the whole process, including my interview, to be completed.

So I'll be going down to Tesco for one of those binders, then.
Viewing all 144 articles
Browse latest View live